Really cool ideas. Awesome, even.
Need an example? Okay, well, for instance, shelves. We purchased items to make our own shelves, wood, brackets, etc.-several years ago. They are still in the laundry room, taking up space. On the floor. In the corner.
Oh, and a few years ago, we talked about building our own cabinet for our clothes which would eliminate our closet and two hand-me-down dressers that take up so much real estate in the bedroom. This idea came after a trip to Ikea while in Georgia for a mini vacation - about four years ago. Talked...is the operative word.
Then, there was this one time that we chatted about building a BBQ pit in the back yard, with benches and a walkway...yeah. That didn't happen. Nope. Not one bit.
We are dreamers. Not doers.
Until this weekend! We finally took the plunge and DID IT. We created a headboard for our king-sized bed. (I have included the link to the video that we used at the end of this post. In the description portion of the page that the video is on, there are measurements for all sizes, from twin to California King).
We have been married for over 20 years and only had a headboard for about a year. It was this really cool sleigh bed style with wrought iron slats. Then we had our daughter, and visions of her sticking her little head through them and us not being able to get her head back out...well, that didn't last very long.
She's 10. Her head has gotten bigger, and she is less apt to put it between slats and such. So, it's time.

My hubby showed me some Youtube videos with projects for headboards. We really liked The Rehab Life videos. They had simple construction projects with beautiful results. And, they included their adorable dog.
The next day, hubby went to our local Home Depot and bought the needed supplies, which for us, was almost everything. That was on a Saturday. It took much longer than he expected as he had to dig through a ton of warped boards before he found the perfect ones. Add to that the hectic crowds out for Christmas shopping, traffic, etc., so he was not able to start the work that night.
This is a picture of the line at Target on Sunday which is where I where I was while he was sanding the wood pieces in our back yard. Even though it was very cold, he was probably better off than me!
On Sunday, he built the headboard.
He. Built. The. Headboard.
The whole thing.
In one evening. (Enter the Hallelujah chorus...)
I state this like it is a miracle, because, well, it is. We are notorious for starting projects and not finishing them! We are professional procrastinators.

Hubby cut the boards down to size. It wasn't very complicated or time consuming but it was cold. Seriously cold. Little-bits-of-flurries cold.

Once he cut the boards and sanded them, he brought the materials inside and got to work nailing and gluing. We had lots of discussion about which side of the boards to use. We're silly like that. By the way, I say "we" because I helped. Well, I called out measurements (that he had memorized), watched while he cut the boards, and also observed while he nailed and glued the headboard together. So, I helped....right?
This is what it looked like once the nailing, gluing and design team talks were completed. Next, we hung a plastic drop cloth in our kitchen area and sat the headboard against the protected wall.

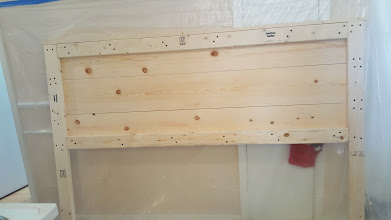
We really liked same finish that the couple in the video used so we got Honey 272. Funny, I used to be so in love with the natural wood look. Now, not so much. I really like this finish, it is dark, but not too dark. Warm. Bedroom-y.

And here is the finished product! Our new headboard! Isn't it pretty. and rustic, and gorgeous? I am really pleased with it. Pleased as punch! The fact that we made it ourselves, makes it so cool. The fact that we finished this in a weekend is amazing and makes it so much cooler!


I have added the link to the video we viewed for this project. This couple has some really neat projects that are affordable and doable. We are already looking at their videos on a frame for a mirror, and a shoe rack that they called industrial shelving (which looks like a three-tiered lovely thingy and shoe rack nor industrial shelving seems to do it justice).
We are also searching for a DIY video on the "cabinets" idea we fell in love with at Ikea...that we now know to be called wardrobe cabinet. They may have one and we haven't gotten far enough. I am hoping so because we really like how they do what they do.
No longer "just dreamers", we are on our way to becoming bonafide "doers". With little to no experience, we crafted a beautiful, life-long, family heirloom that may someday be considered an antique and quite possibly end up in the Smithsonian....nah, still dreaming! I did put hubby's name and the date in sharpie ink on the back. I can see handing this down to our daughter some day who may hand it down to her daughter. So, maybe not a museum, but definitely a family thing.
Here is the link I told you about earlier:
P.S. The $20 Rustic Headboard Project by The Rehab Life folks ended up costing us a wee bit more, I believe The Rehab Life people probably had a lot of the supplies already on hand. This is what they do, I mean, the name says it all...rehab...meaning recycle, redo, DIY projects, etc. Plus, their project appeared to be for a queen-size or a full-size bed. We purchased the wood ($82.17), glue ($5.47), nails ($3.47), screws ($5.98), sponge brush ($0.77), stain ($7.77), plastic drop sheet ($1.98), lag screws ($3.12), washers for lag screws ($0.84) and a specific blade for the circular saw ($13.97) for a total of $126.31. But it was worth every dollar and every penny. It still cost less than what we would pay for if we went shopping at a furniture store or even sought out a carpenter. So we are more than pleased and even a bit proud. Thanks Rehab Life folks! Say hello to the cutie patootie pup for us.
{Purse}onally Yours,
Beautiful! I want one! We had a headboard for 5 years and then kids so we got a King sized bed and never had a headboard again. We're going on 27 years. 😊
ReplyDeleteTina, love this post! And LOVE the headboard. It's gorgeous! You all did a great job!
ReplyDelete